Showing posts with label Beauty. Show all posts

Tuesday, 11 July 2017

Huda Beauty Liquid Lipsticks - Review and Swatches

Huda Beauty Liquid Lipsticks

I've wrote a blog post on Huda Beauty before (their textured shadow rose gold edition) so I thought it was only fair I would show you their liquid lipsticks as they are just as popular as their eye shadow palette. Number 6 on Cult Beautys' Top 10 list it is interesting to see how they compare to other brands I own. As they are very resonably priced at $18 I ordered three shades Bombshell, Trophy Wife and Famous as they are light, medium and dark shades so I can see how the formula does with the usual streakiness towards darker shades. I have obsessed with Huda Beautys' liquid lipsticks since I started following them on Instagram almost half a year ago, I love the variety of shades and how the lipstick looks on people (they share a lot of people using their lipsticks and videos to give you tips on using it) which is nice as I got to see what the shades will look like on my pale skin.

The packaging to start off with is really unique and cute, the lipstick in between the lips is something I've seen loads of people copy when they have their Huda Beauty lipsticks on. You get quite a lot in the tube which is nice considering how inexpensive it is compared to other brands I usually buy. The formula is really easy to apply and doesn't dry too quickly so you can get even coverage over the whole of your lips without having to layer it.
Trophy Wife (top shade), Bombshell (middle shade)
 and Famous (bottom shade) 

Not only is the smell really nice (like a chocolate scent) but I do find that if it hasn't fully dried down you can easily smudge it bi-accident. After wanting to buy these for so long and actually having them I can really tell what the hype is with them, not only is there 16 shades ranging from Video Star (a hot pink) to Venus (a almost light brown shade). Compared to other liquid lipsticks I own I find this one you can barely tell you're wearing, it feels comfortable on the lips and light, but passes the drinks and food test. To removed I used my Lush Sugar Plum Fairy lip scrub as it doesn't come off easily with a baby wipe as other liquid lipsticks.

I will definitely be buying more as I can tell they're already having a place in my make up collection. I'll keep you updated if I buy anymore shades on my Instagram and Twitter with swatches.


If you'd like to try them out then you can get them at Cult Beauty in the UK or the offical Huda Beauty website in America

http://www.shophudabeauty.com/?v=79cba1185463

https://www.cultbeauty.co.uk/top-10.html?ref=mm

Tuesday, 30 May 2017

The Body Shop Mini Haul - Which Products I Got and Are They Worth It


The Body Shop

The Body Shop have been around for 40 years, using all natural produce inside the products to make it as organic and healthy for you as possible. Known mostly for their skin care products they have recently (in the past 3 or so years) starting creating beauty products, from brushes to blushes so naturally I have been dying to try them!


While I was in the shop I swatched a few of their foundations  hoping to find one which is close to my shade as the main issue I have with foundations are them looking good in my bedroom or bathroom lighting but outside in natural light I look orange or it oxides to orange later in the day but reading reviews I had heard very mixed reviews, another blogger was talking to me about how she broke out in little white spots all over when she used it so I was a little optimistic to try it out in case I broke out as well. The shade isn't exactly the correct shade for me but I used the next product with it mixing it together and created the perfect shade for me! I wore it to work with a little of the Benefit Porefessional Mattifying Primer underneath and not only did it last all day but it felt very comfortable on my skin like I wasn't even wearing a foundation. The shop assistant told me it is light to medium coverage so I did have to use a little concealer just to cover up a few blemishes I have been struggling with. Taking it off I didn't notice any break outs until the next day when I had a break out or two but it wasn't anything too bad just my skin adjusting to the formula as my normal every day foundation has break out prevention in the formula. It is a little on the expensive side at $15 for a bottle but I think it is worth it for when you want a light weight foundation which isn't thick or high coverage and it being all natural you don't have to worry about chemicals hurting your skin.

I had seen their Lightening Shade Adjusting Drops all over Instagram with reviews on how well it has worked and how people can finally have their skin tone with any foundation they choose by just adding one or two drops which of course enticed me as I really struggle to get a foundation which is my skin tone and will stay on all day then if I find one which is almost my tone it seems to oxides and go orange which isn't ideal. I used 2 or 3 drops to get it to my shade but it was well worth it! It didn't seem to change the formula or water it down what I was worried about happening so I am really pleased with it! I used it with the foundation I brought from the haul and with another one I have been using for months and it worked just as well. For the size of the bottle $10 is really cheap considering how a little of it really goes a long way.

As there was a 3 for 2 offer I talked to the assistant about my skin and she suggested trying the Tea Tree Oil Anti-Imperfection Daily Solution to help my oily skin balance out. I had seen a lot of people on YouTube and Instagram using oils in their skin care routines but never really branched out until now and I have to say I love it! My skin has never looked better, my make up stays on longer and I have only been using it for a week! She told me to use it after cleansing and toning before moisturising so I have followed her instructions in the morning and at night and I really have noticed a difference, when my pomade dries out I have used it and it has worked really well! I need roughly 4 drops to cover my whole face but the bottle is decent, I love the dropper as I have issues with my hair oil which is in a push cap (it goes everywhere and you can't control how much is coming out) and it feels amazing. If you have oily skin as well this could really work out for you like it has for me, the assistant said 'you have to fight oils with oils' and I'm finally starting to see that and at $13 per bottle it is worth trying it out!.


While I was at the check out not only did I sign up for the Love Your Body Club but I also got a $10 off voucher to spend in store during June which will be handy for my next Body Shop Haul!.


https://www.thebodyshop.com/en-gb/?gclid=CjwKEAjwsLTJBRCvibaW9bGLtUESJAC4wKw1I3P29KOL4uuw8iYDvGKzKWUHJV3oRbgNa4sAY0PUfhoCsr_w_wcB&dclid=CN_6746jmNQCFZI-GwodyBYLag


Friday, 21 April 2017

Drug Store Foundations For Pale Skin

Battle Of The Drug Store Foundations

Finding a decent foundation at a reasonable price is a struggle, hunting through Superdrug or any high street shop for a shade what will match your skin tone, type and the right coverage for you is a long process. I've had foundations which made me break out, made me tinged orange and made me as white as a sheet of paper. It's not easy wanting to save money and not spend in the $30s' for a bottle which will last around a two or more months at the maximum so this will be a review of the foundations I have found actually suit my pale skin for a reasonable price.

To start this off I'll go with the cheapest foundation then work my way to the most expensive out of the four favourites I've found out of my years of searching. 

E.L.F Flawless Foundation

I brought this foundation when I was doing the full face of make up for $20 blog post but I did notice this had amazing reviews and I can see why! The formula is creamy but lightweight with full coverage. It is a little yellow compared to the other shades I have found but if you use the Silisponge you can even it out with using less product and blending it in right. As I have oily skin I am careful about what foundations I buy as not only do I want the colour to be perfect but I want to fight off the a make up meltdown or making me look even more oily but this seems to fight it off. Not only does it last long and suit my skin but it also has SPF 15 Sunscreen so will be perfect for summer without having to mix sun cream in separately. This is only $7.50 on the website and hopefully they will have a stand in Superdrug soon!.

Maybelline Super Stay Better Skin Foundation

I brought this foundation when I was struggling with break outs and I wanted to find something to help with it and so I could wear foundation all the time without suffering. The shade is slightly orange but with blending it evens out to my skin tone. The lightest shade they have is Light Beige which is a shame, but luckily it is close enough to my shade. It says better looking skin in 3 weeks but you can tell the difference within the first day of applying it, if you use it every day then you will notice it does really help if you are struggling like I was at the point of using it. This amazing foundation only costs around $7-$8 at Superdrug.

L'Oreal Infallible 24H Foundation

Out of all of the foundations I have brought this has to be the most accurate to my shade, it is a little white but with a bit of bronzer you don't notice the difference. It is full coverage but light weight, doesn't oxidise at all throughout the day and stays really well. L'Oreal really did a good job with this foundation, it doesn't say anything to do with skin care but it doesn't break me out at all. It says on the tube it helps prevent meltdowns and I don't see any oil patches which is great. For only $10 as well it is very affordable whenever you run out. 

Revlon Colour Stay Foundation

Revlon was a brand I looked for when I was in the middle of my hunt and fell in love with but I did found it made me look the palest and as it has pink undertones I found it made my face look flushed all the time. But if you do have pink undertones on your skin then this would be perfect for you. It is lightweight, full coverage and a perfect one for summer as it leaves your skin feeling soft and has SPF 20 for the sunny days. This is the most expensive out of all of them but I can see why, the formula is rich and feels amazing and the coverage is amazing. You can easily find it at Superdrug for $12.99. 

If you've found any foundations you find suit pale skin or just love then let me know in the comments! I hope this helps you on your hunt for your perfect shade!

Saturday, 18 March 2017

Full Face Of Make Up For $20 - MUA

Full Face Of Make Up For $20

I know I don't use much drug store make up as by the time I've come to writing a beauty blog I have been using more high end make up for a few months so I review what I have. Now I find a few people asking about drug store or more budget make up so I thought I would do a blog on a full face of make up for $20 to see how much I can actually get for my money. There are tons of brands I could use for this as I walked through Superdrug I saw how many brands I have been missing as I've been so focused on the higher end products! If buying the Sleek Box Of Tricks has taught me anything it is that the drug store brands are defiantly worth another shot and can be 100% as good as high end brands if not better. If I get comments underneath telling me brands you would like me to do this challenge with as well then let me know and I'll try to make it a monthly thing! 'Full face of make up' to me means; foundation, highlighter, mascara, liquid eyeliner, eye shadow palette and liquid lipstick as this is what I would class as a full face on me. I was going to add contour but as most palettes are at least $10 it would cut my budget in half.


To kick start this challenge I have wrote a list of brands I originally thought I would be able to get my full face for $20 but was quick to add up and realise some were over $40! I came to find three brands I could find everything and one I didn't realise doesn't actually do mascara and eyeliner. To kit start I decided to go for a brand I haven't used before as I thought it would be interesting to try something new and I have heard good things about them! MUA. I have heard loads of things about their Luxe Velvet Lip Lacquer and I am a huge fan of liquid lipsticks so I decided to buy an extra one with the money I had change from the $20 budget. On their site it says 'We know that looking good is important and so is saving you money, which is why our products are of the highest standard but at a super low cost' which is exactly how I think it should be.


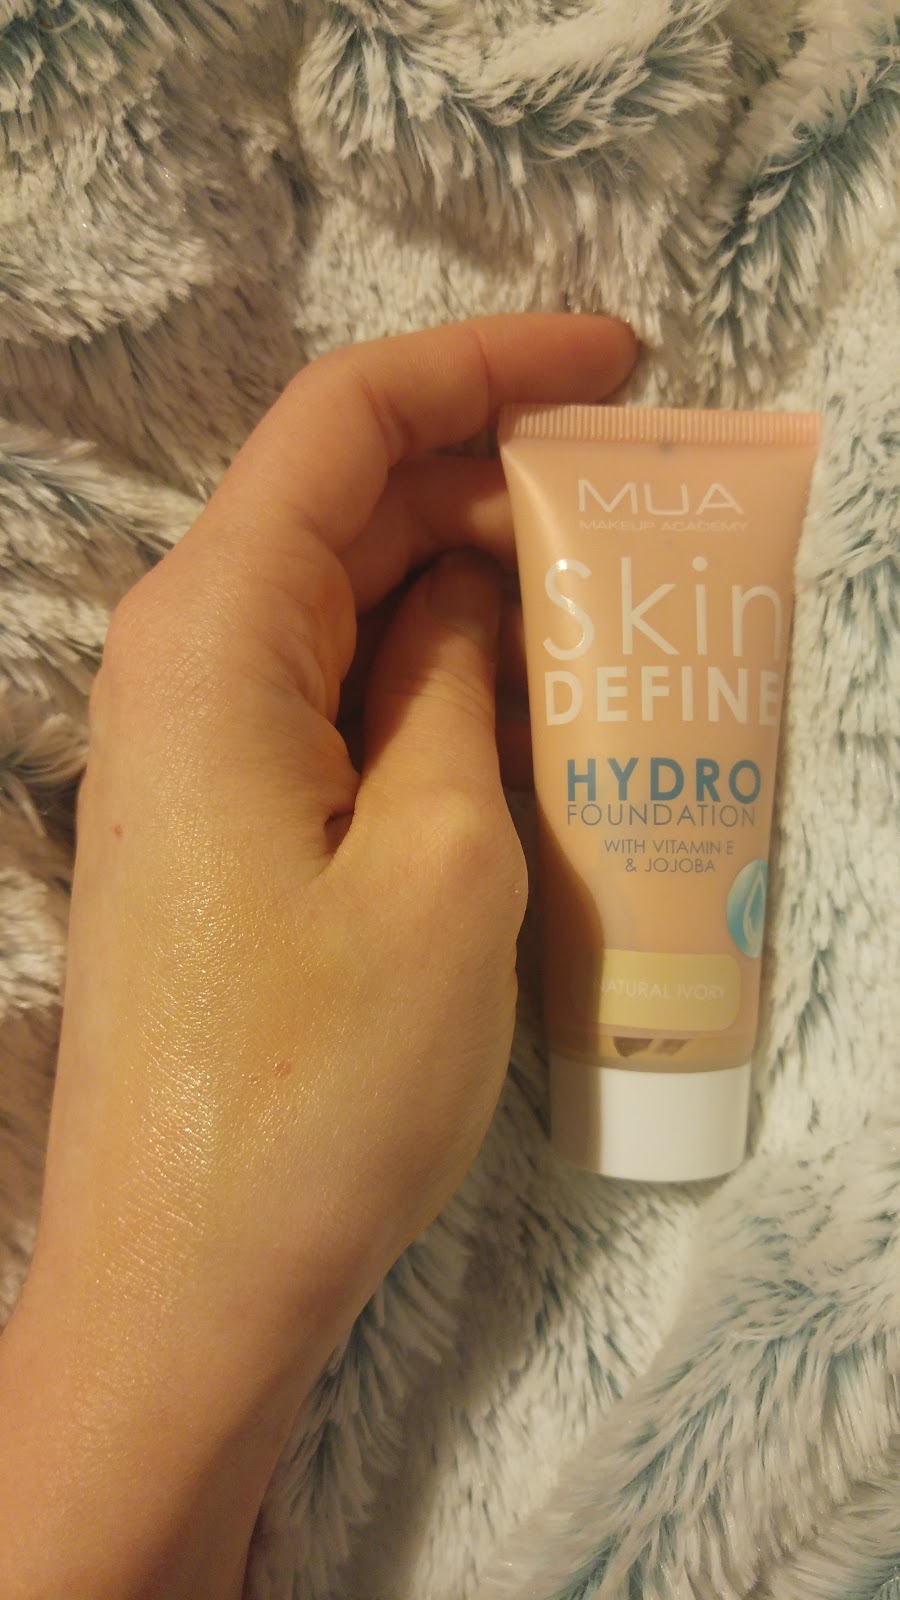
To start off with I brought the Skin Define Hydro Foundation in Natural Ivory (the lightest shade they offer) which cost $3.00 (on sale originally $4.00). Then I chose my mascara picking the Curl Mascara as I liked the look of the wand as the shape looked like it would be able to cover root to tip of my lashes which cost $2.00. It was hard to choose an eye shadow palette as they have so many but eventually I chose the Hall Of Fame as it has build-able shades and a couple of blues to make it more of a striking look which only costs $4.00. I only really use liquid eyeliner and I don't like the felt applicators when I'm doing my eyeliner so I chose the Matte Liquid Eyeliner in black which only costs $2.00. They have several shades of highlighter sold singularly but I brought the shade 'Iridescent' as I prefer a glow with not much colour which only costs $3.00. To finish off the look I brought the Luxe Velvet Lip Lacquer as I have been dying to try them! the shade I got for the look is 'Symphonic' (blue with a purple undertone) as it will go with the eye shadow palette perfectly then as I had $3.00 extra I also brought the shade 'Lacquer Poise' (a purple grey) then a Luxe Whipped Velvet Lip Lacquer in the shade 'Majestic' (a deep red) as it was on sale for $1.50 instead of the usual $3.00.
In total without the two extra lipsticks it all cost $17.00 in total which is really good considering how much you get! Now to review the products and show a finishing look...


The first item I'll be reviewing is the Skin Define Hydro Foundation in the shade 'Natural Ivory' (the palest shade they have in this foundation). Squeezing a bit onto the back of my hand it looks a bit dark for my skin tone but I should be able to blend it out to make it look like my shade. As this has Vitamin E and Jojoba in it I expect it will be like Maybelline Better Skin but more light weight than the Maybelline one. It feels more like a tinted moisteriser than a light weight foundation and has a very nice natural glowing finish. It is like a very nice BB cream as it makes the skin feel very moisterised and soft, the skin feels breathable without having too much on but like a BB cream it doesn't give the best coverage so using a concealer would be a good idea. In the summer this will be perfect! or on holiday where you don't want to wear much heavy make up more natural. I do find that even though this is the lightest shade they offer in foundation it is a little orange (I struggle with this quite a lot) but adding a little of my usual moisteriser it does seem to work a little better with the orange tinge. Next time I will definitely be buying the other foundation they have, Skin Define Matte Perfection Foundation as it offers a lot better coverage so I won't have to use concealer over the top and it will be a lot more like the foundations I usually use every day.


Next products I used is the Hall Of Fame palette making a really simple eyeshadow look as the foundation isn't that heavy and I was only going out shopping that day. In the swatches, starting from the top, the first shade is 'Shy' (a matte shades the same as my skin tone) then 'Rose Ash' (A rose tone shimmer) , 'Bare' (a champagne shimmer colour), 'Catacomb' (a nude with pink under tone shimmer shade), 'Lion' (a gold shimmering shade), 'Chino' (a dusty purple shade with blue undertone), 'Reveal' (silver shimmer shade), 'Hustle' (a plum shimmer shade), 'Tectonite' (a grey purple shimmer shade), 'Cool Grey' (a dark blue with green undertone shimmer shade), 'Hydra' (a almost pastel blue shimmering shade) then last of all 'Titan' (a blue, black shimmering shade). Out of all of them my favourites have got to be the shades 'Rose Ash' for the inner corner of my eye and a dash under my eyebrow then 'Chino' for the crease, a dash of 'Hustle' in the outer corner of my to really make it pop then move into the centre of my eye where I blend with the Rose Ash shade. The formula is really rich and creamy! considering it costs $4 for the palette it is a total bargain! There is a little bit of fall out, but I used some loose powder under my eyes so it won't effect the foundation I've already put on.


Since my eyeshadow blended really well I moved onto using the Lift& Curl Mascara. The wand is a really nice shape to be able to cover all of my lashes completely from root to tip. You do have to wipe off the extra product from the top of the applicator where it collects but apart from that one dip is enough for both eyes to give a nice natural look. As I didn't want any getting on my lid I used one of my old college IDs to keep it from going on my lid until it dried. It looks nice and makes them look long and natural but doesn't really give a dramatic look unless you put on a few more layers that I only did a few hours after the final photo was taken. At the end of the day there was slight smudging on the bottom of my eye from the mascara but nothing really noticeable so it lasted the day really well. I do think it is really good as more of a every day mascara or the first step to building up lashes to almost fake looking ones as it separates the lashes really well only giving a thin coat.


I found the eyeliner quite hard to work with as I'm not used to how thick the tip of the felt liner applicator. I did practice on my hand before I did it on my eyes so I could get used to the applicator, but still found it hard when it came to getting it thinner towards the inner corner of my eye. I did find that it can smudge really easily so I went over it with a little bit of black eyeshadow just to try keep it in place before going over it again with the eyeliner again. The colour is very pigmented and dries really quickly (within five seconds) which does make it a little harder when it comes to messing up as you don't have time to correct it. Once it is on it is on though! It doesn't budge and is completely smudge proof! When it rains it does loose a little colour and you do get green lines from where the rain hits it. This would be a great summer eyeliner as it doesn't fade and doesn't smudge very easily.

The second to last step was of course my highlighter! This is almost a white shade but when you look in the light it has a really yellow and gold shimmer to it making you look sun kissed and your cheeks really pop. One swipe of the highlighter is enough to use on both cheeks and to give a really subtle look. It is build-able without looking like a chunk as blending it is easy with a nice fan brush (I use my Zoeva 129) and it even works really well in the inner corner of my eyes and under my eyebrows. For how cheap it is it is as good as the expensive ones! The Jeffree Star highlighters are only a little better than MUAs ones. They have other shades as well, but as I was looking for something subtle this is perfect and it blends really well with my skin tone which I have problems with some other shades. The picture doesn't do it justice with how much it shines in the light! It looks like you've got a mix of glitter and shimmer on you. This is defiantly something I will be buying again, I might try out the other shades as well as there is only around 6 shades mostly looking like shimmering blusher than highlighter in general.


To finish off my look I used the shade Poise (top swatch shade) as it is a really nice nude shade, but as it is quite dark for me it gives it a nice look with all the rest of the make up. Symphonic (middle swatch shade) is really good for a dramatic look, if I was to use it I would use the Jeffree Star Beauty Killers as there are some really nice purple tones which would look perfect with this shade or I would use the MUA palette with the purple and blue shades for a night out look. Majestic (the last swatch shade) isn't like the other two lipsticks as it isn't a matte shade, it doesn't dry down fully either so it is easy to smudge. Out of all three my favourite has to be Symphonic as it isn't like any other shade I already have which is rare for me as I have so many. It is nice to be able to have something to go for a more daring look with instead of always sticking to red lipsticks when I get ready to go out. As they are so inexpensive as well it is a really good brand to try different colours you wouldn't usually buy and they have so many as well so you have a good range to choose from. They passed the eating and drinking test, I do find that you have to top it up after eating something greasy as it degrades it in the middle and if you get the whipped velvet then I would recommend wearing a lip liner underneath just to help keep it in place for longer and remember as it doesn't dry down fully it will go on anything your lips touch.

The finished full face actually looked really nice and I was presently surprised. The eye shadow is really buttery and doesn't budge after you put it on. I didn't use any other products apart from the Kyliner in Black on my brows. The eyeliner was a little harder to use than when I tested it out before I did the entire face so they did go a little uneven but nothing a little make up remover on a cotton bud didn't fix. This was a much more simple look and if you want to see a full face going out look using this brand then let me know in the comments! I hope you liked the blog post and I'll let you know on my social medias when the next full face for $20 post will go up with the new brand!


http://www.superdrug.com/brandshop/mua

Tuesday, 14 March 2017

Too Faced Melted Matte - Swatches and Review

 Too Faced Melted Matte

 To do a review of this product I ordered 12 colours from them ranging from a nice set of nearly 6 nudes (with different undertones) and another 6 of various shades I wouldn't usually use but I want to try something new. This is a brand that I haven't tried before so I was really excited to see the parcel from Debenhams arrive knowing what it was. I've seen high reviews on YouTubers channels and I couldn't wait to get my hands on them to see how they compare to my other lipsticks (being a fan of liquid lipsticks). I really like that it says on the side of the packaging that the 'formula glides over lips like a gloss but dries to an ultra-matte opaque finish' and is 'infused with a no-sting plumping filler' and can't wait to see if it is true! I love the packaging with this product as the shape of the tube makes it easy to stand up on its own in my make up organiser on my dresser and with the lid having the 'tf' shown on the top it makes it easy to pick out from the other lipsticks. So onto reviewing the actual product...

For the first set I tried I used the nude colours to swatch together before the more adventurous shades. These are much more every day shades you can use for a more natural look or a little adventurous with the dark nude (the brown). As you can see from the swatch they are all very nice nudes with different undertones. From the top swatch down it goes; Queen B, Child Star, Sell Out, Bend & Snap!, Miso Pretty and last of all Naughty By Night. 

Queen B
The first shade I used on my lips from the collection was Queen B, this is one of my favourite nudes out of the collection as it matches my lips perfectly for a pink undertone shade when it normally looks too strong. This looks a lot different on the lips compared to on your arm (looks streaky on my arm but all one nice shade on my lips). Putting it on is easy, it's not as fast drying as other brands I own making it easy to adjust and get even coverage without having to layer up. I only had to use one dip of the lipstick to get full even coverage for my lips. The colour is very pigmented and doesn't have a need for a liner underneath as it goes on smoothly by itself. I love the formula of this, it's a little drying however that's expected from a liquid lipstick in general anyway. After wearing it for 20 minutes and deciding I liked it I used a make up wipe to take it off which was pretty easy. It doesn't sit in the lines of your lips even when dry like some other brands and I could barely tell it was on. When I had a sip of drink there wasn't any smudging or trace I was wearing lipstick which is a huge bonus.

Child Star

The second shade I used was Child Star, this one I find not to be the right shade for my lips as you can see in the photograph it almost blends in with my skin tone making it look more like I was wearing concealer on my lips rather than a lipstick on. It wasn't streaky and the colour was even with only one dip of the liquid lipstick. I did find it made my lips look a little smaller with the colour but I think if I didn't have such pale skin it would suit me a lot better. The formula is still really nice and there wasn't any residue of me wearing lipstick while I was having a drink. After wearing for 20 minutes like the other one I took it off using a make up wipe which was easy and let no mark of the lipstick being on. 


Sell Out
Next I used Sell Out which has a really nice peachy undertone. This one is much better than the last one, Child Star, as the undertone made it a lot more suited to my skin tone. It made my lips look a lot more fuller than the last shade as well because the peachy undertone gave it a lot more of a healthy look. This is definitely one I will be using on my casual days as it is a lot more natural and perfect for the days where you want a 'no make up' day. Just like the others I have managed to get full coverage and colour with only one dip of the product. The wand is a good fit for my lips as well and is a little thin so it was easy to get into the corner of my lips. As I was taking this one off after 20 minutes I did notice my lips started to look slightly fuller than before I started to swatch the lipsticks. Maybe they actually do what it says on the side of the box it comes in or doing lip swatches not that far apart with taking it off with make up wipes. When I use one of these lipsticks for a full day I will write at the bottom if it was just swatching my lips so much or if it actually is the formula. 


Bend & Snap!
The Bend & Snap! shade is a little brighter than what I would usually wear but is still is a nice shade. Buying these shades has already made me realise that I need to get more shades I wouldn't normally buy as they actually look really nice! The bright pink isn't as full on as It's Happening! but not as much of a nude as the other shades I've swatched. This is like a Barbie style shade so if you're struggling to find a pink colour similar to Barbie shade then this is the perfect one! This is only one dip of the colour as well and look how bright it has gone! It makes your teeth really white as well which is a good bonus. After being four colours in to swatching on my lips they're starting to feel a bit dry so I applied a bit of Vaseline to make sure they don't dry out too much. This would been a really nice summer shade and once it's on it's not going to flake or smudge or move yet is easy to take off with a baby wipe. As I carry on swatching my lips do start to carry on getting fuller the more I carried on and keep getting drier. 


Miso Pretty
The Miso Pretty shade is a lot like Kylie Cosmetics Exposed shade with less of a orange undertone. This makes my lips literally blend right into the rest of my skin only showing because my lips have become more fuller with all the swatching. I don't think I'd buy it again but I would like to try it again to see if it would like nicer with a lip liner underneath it to give it an actual undertone. The formula is still really nice compared to other brands I've used and it does seem to be giving my lips a more fuller look even when I've used my baby wipe to take it off but I still have to add a thin layer of Vaseline in between coats of  lipstick. As this was second to last in the nudes I started with I took a small break inbetween switching shades so my lips had a little time to feel moisturised again as I'm finding them quite drying. They are still consistently pigmented and whatever the formula is it is one of my favourites for liquid lipsticks as it doesn't budge at all compared to others I have used. 


Naughty By Night
The last shade in the nude collection of these lipsticks I have the Naughty By Night shade which is much more of a striking brown than I first thought. Swatching it on my arm I thought it was just a brown like True Brown K (Kylie Cosmetics) but it is much more of a redder brown and less of just a pure brown that I prefer more. I haven't really tried a brown before but I do actually like it, I'll have to try it over again to see if it does actually suit me but it is looking promising with the Too Faced 'Chocolate Bar' eyeshadow palette. I did have to find that I had to put on a little more product with this shade as it is slightly darker and was slightly streaky but apart from that it was just like the others. Even as this is a little darker I did expect it to have a little fall out or smudging but I still didn't get any! I'm hoping the darker shades will be like this as well!. 


Moving onto the last six shades I found myself 
liking the different shades I've got to try when I brought these lipsticks. The formula is nice (but I wouldn't recommend swatching twelve in one day like I have!) and provides even coverage even with the darker and lighter tones! From the top swatch the shades are; Mrs. Roper, 1998, It's Happening, Feelin' Myself, Lady Balls then Unicorn last. 


Mrs. Roper
 For the first shade I tried the Mrs. Roper, this is much more of an orange undertone red than what I first thought it was going to be like. It looks almost like a summer red compared to the striking reds or dark reds I usually go for. This would look good in summer time but at the moment it is way too bright for this time of year, maybe would of been a good Christmas day shade. I have found with these lipsticks they do look a lot different from the arm swatch then they do on the lips and they were a lot harder to get off from the arm swatch than the lips! They do leave you a little bit dry but the liquid doesn't go into the lines of your lips which is nice compared to other brands like I've said when it came to the nudes. The formula is consistent considering the variety of shades and there still isn't any smudging or flaking or look of it disappearing when eating or drinking.


1998
The next shade is 1998, now with this one it isn't my type of shade at all, I'm definitely not a pink kind of lady however this shade is quite nice. I mean I wouldn't wear it every day, it's more of a every once in a while kind of lipstick to go with minimal make up. This would look nice for Valentines day if you want a bold pink instead of a red to wear. It is obviously the same formula as the other lipsticks so it has a nice finish to it and doesn't sink into the lips. It does take a little longer to get off of the lips than the other ones I've tried as it slightly stains the lips but not noticeable. 


It's Happening!

The next shade was the It's Happening! which is quite similar to the last shade (1998) in it is a quite bright pink. It does have a slightly darker undertone however but is still quite a strong bold colour. It passed the eating test as it was lunch time and held up against soup with no smudging on the spoon like I have had with other brands before. This one did fade slightly in the middle from eating as you can see in the photograph but that was the only part which faded at all. I used two dips of the lipstick for this one as it was starting to become a little less even compared to the others but it didn't effect how it dried or how it looked at the end.


Feelin' Myself

 The next shade is slightly a nude however is did look a lot more like a darker shade when it was in the tube, Feelin' Myself is a very peachy shade. I like this one as it does make my lips look really healthy but I did find that the corners of my lips went slightly orange compared to the rest of the lip colour. It is much like an every day lipstick that I found a little disappointing compared to the rest of the shades but I will still use it. Since I am on my tenth shade my lips have got a lot bigger! I'm still not sure if it is to do with the lipstick or all the swatches on my lips but I like it!.


Lady Balls

The second to last shade is Lady Balls, a really nice red quite similar to Kylie Cosmetics Holiday 'Merry' lip kit. If you're looking for a cheaper dupe of the Kylie Cosmetics lip kits then I have found they are quite similar shades! I'll do a blog post with dupes for the Kylie Cosmetics. This one I had to use two dips of the lipstick as the first dip was still quite light and not the complete shade it was meant to be. I did find this a little harder to use the applicator maybe because of the shade? but I would recommend using a liner for this one just to make sure it doesn't bleed outside of the lips. It did stay in place for the whole 20 minutes and it did slightly leave a stain on the lips from it.


Unicorn
This last shade has to be the boldest lipstick I now own, I've never used a purple before so I am pleasantly surprised by how nice it looks on my lips! It makes them look a lot bigger than they are naturally and I have to say that I didn't take it off for a good 3 hours before I wanted to take it off to put Vaseline on. I had a lot of control with this considering how dark it is and it did actually make my lips a bit bigger than they are naturally which is really nice. I have to say that I have been impressed with most of the shades that I brought and there are a few I will definitely be buying again when this tube runs out.


My favourite out of all of the shades have to be Queen B as it is a perfect nude colour for my skin tone that I normally struggle with, Naughty By Night was a nice change and it was the most surprising out of all of them with it having red mixed in! then of course Unicorn as I haven't tried purple before and I am really surprised with how much it actually suits me. Over all I think these are definitely worth a buy, they are a little bit expensive but they really are worth it, the formula is amazing and the bonus of it slightly plumping your lips as you're wearing it makes it 100% worth every penny. Hopefully now you've seen the shades swatched on my arm and my lips you'll be able to find your perfect shade! Each lipstick costs $19.00 from Debenhams.

http://www.debenhams.com/webapp/wcs/stores/servlet/prod_10701_10001_154614113899_-1


Friday, 10 February 2017

Younique 3D Fiber Lashes vs Clinique High Impact Mascara

Younique 3D Fiber Lashes vs Clinique High Impact Mascara

In the hunt for the perfect long voluminous lashes you have to try a lot of different mascaras to see which one works best for you. So when Younique brought out the 3D Fiber Lashes they were a hit! In this I will be comparing them to my favourite mascara I've found gives me long lashes. In this first part I will be talking about the Younique mascara then I will talk about the comparison to the Clinique mascara. 

 The first thing you see when the box arrives is how nice the packaging is! There are two sets of instructions one on the box and a handy carry along set for when you want to keep the pouch with you. For applying to this mascara I've found it is easier to control the lashes and make sure they don't stick together if you already have a thin layer of regular mascara on else your natural lashes do then to clump together. The transplanting gel is a jet black colour and you do need to act fast between putting the first coat of the transplanting gel on and using the other wand with the actual 3D fibers on else it will dry and I would advise the first layer of the fibres to be a thin one else you can end up with too much on making them thick. After you've got your fibers on you lock them in and make the lashes look smooth by using the transplanting gel over the top again. If you want to make them look even bigger you can layer up by repeating the process until you're happy. I only used one layer as I did use two before and they were too clumpy for my liking (I prefer the more sleek natural yet longer lashes). I do find that the fiber brush always is packed with them and I have seen my sister using it before and some of the fibers actually dropping in her eyes! (ouch) so you can brush some of them off beforehand onto a cotton pad and always use the brush to collect them back again to use.

Taking them off is a bit of a challenge so I would recommend making sure you use actual make up remover and a cotton pad and be gentle! I've lost a few of my natural lashes being too rough trying to get this off! Baby wipes don't seem to do much against this mascara and I have had a shower and not removed them coming out they hadn't smudged at all! If you forget to take it off before bed you wake up looking like you've just put some fresh mascara on (I wouldn't recommend doing this but you forget occasionally). This is a bit of a tricky mascara to use with the chance of fibers falling in your eyes but when you do it a few times then you start to get the hang of it! I normally use the transplanting gel and have the fiber brush in my other hand ready to use straight away to make sure it will stick to the gel and the gel will still be wet. If you're looking for something new to try then I would defiantly recommend using this! It does take longer than regular mascara but if you're getting ready for a night out then this would be a perfect edition to add to your going out routine!. This is $29 per set but is worth the money.


Clinique High Impact Mascara is one of my favourite every day mascaras that I can also build on for a great going out look! It is a nice gel black and the wand (standard) is easy to use to separate lashes and it drys quickly. You can get a little smudges under your eye from this mascara if it is damp outside or it rains but apart from that it stays put. I like how big it makes my lashes look and how they stay separate all day. If you want a good lengthening and voluminous mascara then I would highly recommend this. It comes off easy with baby wipes or general make up remover. I got two of these in a set with make up remover at duty free on the way back from Spain June 2016 and this is currently the second one I have gone through. You can see how much I use it from how faded the writing has started to go on the tube. The mascara on its own cost $17.50.

Compared to the 3D fiber lashes it is defiantly a tough one. I love both of them, Clinique being my every day and bottom coat for the Younique one and the Younique one being more of a going out or heavy eye make up day. I can say that since I've brought the Younique one I haven't brought any fake eyelashes to wear for going out as I use this instead! It does have a good finish as well just like the Clinique one but it does last a lot longer and is a lot harder to get off! I can't say that one is better than the others but I will let you decide from the photograph instead. 


http://www.clinique.co.uk/product/1606/5416/makeup/mascara/high-impacttm-mascara?cm_mmc=GoogleBase-_-ShoppingFeed-_-Makeup-_-Mascara&gclid=Cj0KEQiA5vXEBRChycOl36LPn5EBEiQAJV2-bNgX5BH10WfHfuBFC_TZMhA9JXdb1xS4pmYjKxlYbmQaAppd8P8HAQ&gclsrc=aw.ds&dclid=CNG8iP3uhdICFaSL7QodTwcNFw#/shade/Black
https://www.youniqueproducts.com/LisaDSmith/products/view/US-11101-03?gclid=Cj0KEQiA5vXEBRChycOl36LPn5EBEiQAJV2-bIiIay7euwslrvtBZamL_wqHI0V85--VWgMLpqpFVMcaAovQ8P8HAQ#.WJ3gx2-LTIV
Clinique on the left and Younique on the right.

First Impressions - Oval Brushes

Oval Brushes

Oval brushes, or artist brushes, are made from thousands of different size strands to create a dense seamless brush. Watching YouTubers like Laura Lee I have wanted to purchase a set to see for myself if they are as good as they look and are raved about. Most companies now have a set or a few of these brushes from unbranded ones like the ones I purchased or Mac and Anastasia Beverly Hills so prices range from under $10 to over $300 for a set. Since I only really purchased these for the blog I thought I would just get some cheap unbranded ones from eBay as they should be relatively the same as the branded ones and a lot cheaper! These have a 2 year warranty, which is really good as I have had a friend who brought a Mac one and it snapped while she was using it then it took a while to be able to afford a replacement.

First use of the brushes was they seemed to absorb some of the foundation (it's a shame but happens with other brushes as well) but feels smooth. I used the largest brush for my foundation and I did find that getting into the harder to reach places (inner corners of my eyes then along my eyebrows) I had to change to the smaller brushes. I dabbed foundation over my face then used this brush to provide full coverage and blend it in to my skin ready for the next steps. For my contour I used my usual Sleek medium contour palette with the brush in the centre of the photograph to shape under my cheek bones to make it more defined. I didn't find that it worked that well so I had to use my usual Zoeva 112 Face Curve brush to make it really pop. I found these brushes really hard to do smaller details like the contouring (I'm not sure if it is just because it was a powder contour so I will try it again with a cream in a later post) or eye shadow as I couldn't blend very well with it.

Overall these are nice brushes, they are fun to use every now and then but I wouldn't just use these brushes on their own. Maybe it will just need some getting used to but I will give them a go and update you later on with if there is a hack to using them better and getting a better pay out.


http://www.ebay.co.uk/itm/162232918981?_trksid=p2057872.m2749.l2649&var=461210339886&ssPageName=STRK%3AMEBIDX%3AIT

Valentines Day 2017 Make Up Look and Products I Used

Valentines Day 2017

Valentines day is a time of love and when you're going out for Valentines day there is a lot of pressure to get the right look. From clothes to make up it takes at least two weeks to decide what look you're going to go for. Me and my boyfriend have been together for over two years so when it comes to events like Valentines day it's one of the rare moments I like to put in a lot of effort with how I look and what I will look like on the day/night. First to help you decide what you're doing on Valentines day, if you're going out for a meal at a restaurant then it's all about getting the right dress to suit the restaurant theme with the dress matching the eye shadow look and the lipstick where as if you're going to a more casual day/night you'll be looking for the perfect outfit to match where you're going and want a more bolder make up look to make you really stand out.

This blog is going to be on what me and my boyfriend will be doing and how I decided what to wear and how I will be doing my make up with the brands I'll be using. This is the first post I will be doing where I won't be really reviewing the products as I have used them before or they are new and will all be future blog posts.

To start off with I'll go through what I will be wearing and why I chose to wear this. We have decided to have a picnic at Rutland Water (a nature reserve/ reservoir near where we live) if the weather is as nice as it was last weekend then while we're there we are going to have a skate around the water as well. As it gets nippy up there I chose my outfit according to the temperature there; jeans, my new jumper and Converse as any other shoes (like ballet pumps) wouldn't work while skating. This is a simple yet nice outfit and with the jumper being a darker toned pink it goes with the whole valentines (pink or red usually). If I have enough time before packing up to go for the picnic I want to curl my hair to make it look nicer.


Onto the make up part... since I know what I will be wearing I know the colours for my eye shadow (pink to match the jumper) for my foundation I will use my usual Maybelline Better Skin foundation (in Light Beige) with Benefits Porefessional primer underneath to make the foundation go on smoother. For eye shadow I am going to use Huda Beauty Textured Shadows Palette Rose Gold Edition as I've tested the look before and liked how it looks so to start off with I used the shade 'Bae' with my Spectrum C06 blending brush to start off with all over my lid as a base shade to set the primer then I used the shade 'Shy' over my crease towards the outside of my eye to give it some depth. Using the Spectrum brush again I packed on the shade 'Flamino' in the outer corner of my eye towards the centre part of my eye then a dash of the shade 'Maneater' with my Zoeva 226 smudger brush  to blend it in to make the crease pop. For the inner corner of my eye I used the shade 'Moon Dust' as it really stands out. When you pick up this palette you know you have to use at least one of the textured shadows as that's what makes the palette so unique so I smudged a bit of the shade 'Angelic' in the middle of my eye up to the crease then used the blending brush again to just gently make it look smooth. For my lashes I used my usual Clinique high impact mascara as I know it makes my lashes look long and stops clumping. For my eyebrows I used Kylie Cosmetics Kyliner Creme Gel Eyeliner in Black with the brush which comes with the kit as I find it makes my eyebrows easy to shape and look nice and natural. In the photographs I have used my Sleek Medium contour kit as well for my jaw line and to make my cheeks look more defined but I didn't use as much as normal as I wanted to make it look more natural. I then used my Sleek Solstice Highlighting Palette to make my face have a nice glow on my cheeks. I might add blush on the actual day but I don't use it that often so I didn't use it for creating the look to start off with. I didn't go with eyeliner like I normally do as I wanted it to look natural and less bold as I would save that for the night time look. I didn't go with lipstick as picnic food can get messy and I wouldn't want to have to top it up.

For the evening we haven't decided what we will be doing so I am going to wear my a simple black dress with grey tights then my Converse again, I will bring my outfit from the day with my so I can change if we have plans which involves being outside again. For my eyelook I will make it more dramatic by adding my usual Maybelline Master Ink eyeliner and a dash of silver glitter eyeliner to really make my eyes pop.

I hope everyone who reads this has an amazing Valentines day and likes my Valentines look. I know it is simple but my boyfriend tends to like the more natural look so I like to make it look as natural but to the outfit as possible. Leave me a comment to let me know what you do for Valentines day and what look you did!. 

Friday, 3 February 2017

SiliSponges - Are They Worth The Hype?

Molly Cosmetics Shipping
Packaging

 Molly Cosmetics SiliSponge

SiliSponges, they're everywhere now a days with Molly Cosmetics already on their 10th restock of the product! They promote their product with the fact you only have to use half as much product to which you normally use with a regular beauty blender or brush. Obviously foundation is expensive and if this little silicone sponge can make it last longer its worth a purchase! So what is is made from? The inner material is made from silicone and the outer shell is thermoplastic polyurethane (TPU) which makes it resistant to oil and grease. Wanting to try this out for myself I then wondered... If it's just silicone surely you can buy it on eBay for cheaper? Molly Cosmetics SiliSponge costing $14.90 on sale for two isn't an every few months cost when you can get beauty blenders for around $5 each. I found a person from Hong Kong (where Molly Cosmetics is based) selling them for $2 so I ordered one just to compare to the official SiliSponge.


First Impressions of the eBay SiliSponge 
Molly Cosmetics Silisponge (top)
eBay replica (bottom)


 The eBay SiliSponge arrived first as I didn't need to be on a waiting list for it so about 2 weeks later it arrived in the post. Not having the Molly Cosmetics SiliSponge to compare to straight away I thought it was a bit firm for my liking but putting a single pump of my foundation on the small silicone blender actually managed to cover my entire face where one pump would usually be almost half my face a little down my neck from blending. The eBay SiliSponge not only felt a little harder than I expected but has a ridge around it where they moulded the two pieces together to make it which seems to collect some of the foundation and isn't easy to get it off without using your finger. Cleaning is easy though with a dab of soap and running it under water (just not hot enough to do any damage to it).


 First Impressions of the Molly Cosmetics SiliSponge
Both Molly Cosmetics Silisponges
Around two weeks after the first eBay SiliSponge arrived the little Molly Cosmetics bag was waiting for me at home when I finished work, I could tell instantly from seeing Jeffree Stars review on the product and their little logo on it. Excited I opened it seeing both the SiliSponges in their separate bags. As soon as |I felt these SiliSponges I could tell the difference between the Molly Cosmetic and eBay one as the Molly Cosmetics isn't as hard as the eBay one is and doesn't have exactly the same shape. The Molly Cosmetics one hasn't got as sharper on the edges as the eBay one is and has a bigger service area and has more of a flat back rather than the eBay one has more of a rounded back making it harder on the skin when you're smoothing the foundation on the skin. It spreads the product on the skin a lot smoother but there isn't much difference with both of the SiliSponges apart from the Molly Cosmetics is softer on the skin, easier to control and doesn't collect foundation around the edges like the eBay one does. 


Over View Of Both Products
All in all both of the SiliSponges work as they should, giving an even spread of foundation onto the skin looking more flawless than with a brush or beauty blender. I'm not sure how long these will last for as this is the first time using them but on the website Molly Cosmetics wrote 'Keep away from sharp objects like your tweezers or brow scissors, and it will last for a very long time!'


If you fancy trying it out for yourself you can find them in the links below:

https://www.mollycosmeticsshop.com/collections/silisponge

http://www.ebay.co.uk/itm/Silicone-Gel-Powder-Puff-Clear-Makeup-Blending-Cosmetic-Sponge-Foundation-Tools/201780842266?_trksid=p2047675.c100012.m1985&_trkparms=aid%3D777003%26algo%3DDISCL.MBE%26ao%3D1%26asc%3D20160608105753%26meid%3D2b786a571284474c89397be2e9a76ac9%26pid%3D100012%26rk%3D3%26rkt%3D5%26sd%3D201757335515